Tuesday, April 23, 2013

Purple Cowboy: Tenacious Red


I recently celebrated my birthday and one of my girlfriends threw me a "classy but trashy" party. What's that, you say? Well, we had super classy food and wine but in trashy ways! Beer Pong? puh-lease. Us classy girls play WINE pong! It was super fun and Mela went all out, complete with two lobsters, super aged and organic steak, a mimosa bar, and bottles and bottles of wine for us to do blind tastings. The fun and presents never stopped and it was a birthday I will never ever forget. MELA - YOU ROCK! I love you!

So back to the purpose of this post (other than relishing in the awesomeness of my friend). One of the wines that we had in our blind tasting was this one: PURPLE COWBOY. As soon as I tried it... I was in love. It's a nice mellow red with an easy finish. I love the body and fullness of the flavour. It was rich and... just so good. Like chocolate. If Michael Buble's voice were a wine, this would be it. Yup, that amazing and even a couple days after it was still just as good (so no, it wasn't the drunk-me just claiming it was good). It's from Napa Valley. No idea how much it cost but Mela really went all out and she has an elevated palate so I can't imagine it's a cheap bottle. Need to get my hands on more bottles of these!

Monday, April 8, 2013

Chocolate Chip Banana Oatmeal Cookies

My toddler LOVES food. It is not uncommon for her to wake up in the morning and her first words be, "I want !". Then she'll start to whine, cry and whimper (while still half asleep) repeating the food she wants.

So cookies were high on her list a couple weeks ago. She must have been influenced by Cookie Monster on TV because I don't buy pre-made cookies and I rarely make them. I had pinned this chocolate chip banana oatmeal cookie and one fine Sunday morning, decided that it was the day she and I were going to give that recipe a try.

Here is the original recipe link: http://www.sixsistersstuff.com/2012/08/chocolate-chip-banana-oatmeal-cookies.html

And here is the recipe:
Chocolate Chip Banana Oatmeal Cookies Recipe:

Ingredients:
2 cups all-purpose flour
1 teaspoon salt
1/2 teaspoon baking soda
3/4 cup unsalted butter, softened
1/2 cup granulated sugar
1/2 cup packed light brown sugar
1 egg
1 1/2 teaspoons pure vanilla extract
1/2 cup mashed ripe banana (about 1 large)
1 cup old-fashioned rolled oats
2 cups chocolate chips

Directions:
Preheat oven to 375 degrees.  Whisk together flour, salt, and baking soda in a small bowl and set aside.  Place butter and sugars into a mixing bowl and beat on medium speed until pale and fluffy. Reduce speed to low.  Add egg and vanilla and mix until combined.   Mix in banana.  Add flour and mix until just combined.  Stir in oats and chocolate chips. Using a 1 1/2-inch ice cream scoop or cookie scoop, drop dough onto baking sheets spacing about 2 inches apart.  Bake cookies until golden brown and just set, about 12 to 13 minutes.
 
On the original website, the photo of the cookies make it appear as if the cookies turn out quite flat. I know that some recipe indicate that you "drop" the cookie batter onto the sheet and as they cook, they melt a bit and come out flat. With this one I dropped the cookie batter and they melted a little bit, but not that much and the cookies were quite... plump (see photo).
 
I didn't have the 2 cups of chocolate chips that it called for. Instead I used whatever I had leftover in the house which was 3/4 cup of large chocolate chips and 1/2 a cup of white chocolate chips. It was okay. You can taste the bananas in the cookies and the cookies themselves are quite soft. They were largely consumed by my husband with glasses of milk to accompany them. My daughter ate a few but she mainly zoned in on the chocolate chips. I don't normally like cookies but these were pretty good. 7.5 out of 10.

Tuesday, March 19, 2013

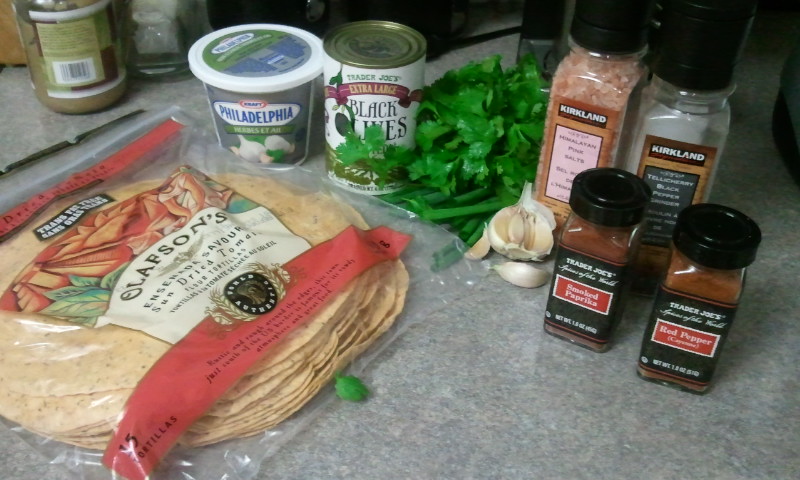
Manu's spicy olive tortilla wraps

A great place for picking up new recipes after confirming their tastiness are work functions. Especially if your work is fond of the potluck party.

Manu, an colleague from an old job has given me tasty recipes in the past: Manny's heavenly hash, chicken soup. Another party pleaser that he often makes are his spicy olive tortilla wraps. I can never have just one. So when my new workplace had a potluck party, I e-mailed him for the recipe. And here it is:


green onion, finely chop
1 canblack olives
6 clovesgarlic
1/4 bunchcilantro
2 containersHerb and dill cream cheese
1 tbsnpaprika
1/2 tbsnpepper
2 pinchsalt

burrito shells

Instructions

  1.  Chop up very finely a bunch of green onion, can of sliced black olives, 6 cloves of garlic, ¼ bunch of cilantro and throw in a bowl
  2. Add 2 containers of herb and dill cream cheese (Don’t use low fat, the real stuff) add to bowl
  3. Add a table spoon of Papirika, ½ table spoon of pepper and a couple pinches of salt (Manu's notes: I like it spicy so I add a generous amount of chilli flakes or cayane pepper)
  4. Mix it all up real well and taste – if you want add more of something now is the time to do it
  5. On a regular size burrito shell (doesn’t matter flavor, white or brown) spread a layer all over
  6. Roll it up, cut the ends off (either throw them away or eat yourselves), and with whats left cut in about1.5 inch pieces


The Finished product - sorry it's so blurry!


Ariana helped me make these - and if a 2-year old toddler can make them, anyone can. She even declared them to be "good" and couldn't stop pinching them. They were quite garlicky and slightly spicy so I'm surprised she didn't spit it out. But then again, she is part Romanian and it was inevitable that she like garlic!

Notes: 
1. I mixed all the first ingredients up in my food processor to "finely chop" everything. It didn't detract from the taste, but I think the next time I do this, I'll manually cut up the olives to improve the texture of the rolls. I think it need some chunkiness to it. 
2. I didn't buy two separate tubs of herb, and dill cream cheese (since the combination didn't exist and I wasn't entirely sure if that was a typo on Manu's part or not) but one large tub of herb and garlic.

A great vegetarian finger food for future parties. Thanks Manu!  

Sunday, March 3, 2013

Homemade Crumpets

I like crumpets. They remind me of my mother who use to have them with butter and jam. So when I came across this recipe on Pinterest, I read through it, realized I had all the ingredients and figured I'd give it a shot.

Ingredients:
3 Packages Active Dry Yeast
3/4 Cup Warm Water
3 Teaspoons Sugar
1 Cup Warm Milk
3 Eggs
3 Cups All Purpose Flour
1 Teaspoon Salt
Butter
Makes 25 Crumpets*

1. Mix the Yeast, Warm Water and Sugar in a glass bowl.  Let the yeast "proof" (get foamy) for 5-10 minutes. 


2. Into the Yeast mixture, whisk the Warm Milk, Flour, Eggs and Salt until no longer lumpy.  Cover with a towel and let rise for 30-45 minutes.

3. Cut 1/2 Tablespoon of butter and melt it on your griddle/frying pan at Medium-High Heat.  Scoop out about 4 Tablespoons of batter and pour it on to your griddle for each crumpet.  You can "eye" it up - pour enough batter to make the size of crumpet you'd like! 

4. Cook the crumpets on one side until they bubble through and appear mostly dry on the tops.  Then, flip them and cook for another 15 seconds

So this is what mine looked like:
Sorry, blurry picture of the batter - very elasticy
crumpets on the griddle.

They were ugly but tasted ok and we didn't need to freeze any because we all ate them within the next few days. I wish I had my homemade butter to go with it.

I tried making some in a circular form I had but it was impossible to pop it out without having some of the batter cake to the sides. I even tried a mason jar lid that someone on the blog had suggested. I gave up on that idea.

While making them, they reminded me of mini-pancakes. The yeast I used had expired back in December but it still foamed. I wonder what the results would have been like if I had used fresh yeast.

Wouldn't mind trying this recipe out again. Maybe with lactose-free milk (or maybe even leftover buttermilk from making real butter) and gluten-free flour.

Jacob's Creek Moscato


On a recent business trip to Victoria, I wanted to thoroughly enjoy my child-free days. Don't get me wrong - I love my kid but it's not often that you get the opportunity to drink without having to worry who's watching the kid.

I picked up this bottle of wine from a hotel-attached liquor store on my way back to my hotel. It was the only Moscato they carried and I was desperate for something easy to drink. I think it was $14. Less than a glass of wine bought at the hotel restaurant. It was a pretty label but I should have turned it around and read the back because I only discovered back in the hotel room that it was carbonated or "frizzante" as indicated. Yuck. Hence the low rating. Otherwise if you like a sweet, fizzy wine this is perfect for you. I let it sit overnight to try it make it go flat and not wanting to be wasteful, tried to finish it off before I left. Couldn't even do that. I think I left what you see above. It was difficult for me because not finishing a bottle of opened booze is alcohol abuse in my eyes! lol.

Wouldn't buy it again but not due to the taste but because I'm not a fizzy-drink kind of gal.

Thursday, January 17, 2013

Salmon with Sesame Ginger Citrus Glaze

I had Sandy and her family over back in August for dinner and found this recipe for salmon:
http://cary.wholefoodsmarketcooking.com/recipes/11780_salmon_with_sesame_ginger_citrus_glaze

Serves 4
  • 2 Garlic cloves, minced
  • 4 teaspoons grated ginger
  • 1 tablespoon Brown sugar
  • 1/4 cup Orange juice
  • 3 tablespoons Soy sauce
  • 1 tablespoon Sesame oil
  • 1 dash toasted sesame seeds
  • 1/4 teaspoon Red pepper flakes
  • 2 Scallions, optional
  • 1 20-oz salmon fillet (cut into 4 5-oz pieces, season with salt/pepper)
In a small bowl, mince garlic and grate ginger. In a large zip tab plastic bag, combine next ingredients brown sugar, orange juice, soy sauce, sesame oil, sesame seeds, and red pepper flakes. Then, add seasoned salmon, garlic, and ginger to zip tab plastic bag; seal. Marinate in refrigerator for 2-3 hours. Coat broiler pan with cooking spray. Place salmon on broiler rack and brush glaze on top. Broil for 8 to 10 minutes or until lightly browned. Thinly slice scallions and sprinkle the scallion slices over the cooked salmon as a garnish.

I bought wild salmon from Costco and I was so impressed with how this came out. It was moist and flavourful and super delicious. I'm having another friend over this Monday and I can't wait to make it again. Photos to come!

Monday, December 31, 2012

Apple Pecan Quinoa Muffins

Ugh. Quinoa? Quinoa MUFFINS? Sounds gross. But Trang at work said that these are delicious. I will try before I totally slam them. Link to recipe: http://lemonsandanchovies.com/2012/08/apple-pecan-quinoa-muffins/#.UOJrl3fVqWE

Apple-Pecan Quinoa Muffins
Author: 
Serves: Makes 12 muffins
 
Forget greasy muffins. These muffins are packed with apples and pecans and healthy, too.
Ingredients
  • 1 cup whole wheat flour (or your flour of choice)
  • 1 cup cooked quinoa
  • ½ cup lightly-packed brown sugar
  • 2 teaspoons baking soda
  • ½ teaspoon salt
  • 2 teaspoons cinnamon
  • ¼ cup vegetable oil
  • 1 egg
  • ⅔ cup milk (I used nonfat)
  • 1 cup chopped apples (about ½ large)
  • ½ cup chopped pecans (I used candied pecans for more flavor)
Instructions
  1. Preheat your oven to 400°F. Lightly grease a 12-muffin tin (or use cupcake liners; I used a ⅓ cup muffin tin) and set aside.
  2. Whisk together the flour, brown sugar, salt, cinnamon and baking soda in a large bowl then stir in the cooked quinoa.
  3. In a separate bowl combine the oil, milk and egg then stir into the dry ingredients.
  4. Fold in the apples and pecans and spoon the batter into the muffin tin.
  5. Bake for 18-20 minutes or until golden brown. Cool on a wire rack before serving.
Notes
Substituting the apples and pecans for other fruit and nuts, as well as substituting the whole wheat flour for gluten-free flour, this would make a good base for other flavor combinations.

Strawberry Trifle Cake

Colleague at work gave me this recipe - said it was an extremely simple layer cake recipe (all it is, is assembling). Something I could do with my 2 year old toddler!

> Original recipe makes 1 trifle Change Servings Makes  servings US
> Metric Adjust Recipe (Help)
> 1 (5 ounce) package instant vanilla pudding mix
> 3 cups cold milk
> 1 (9 inch) angel food cake, cut in cubes
> 4 bananas, sliced
> 1 (16 ounce) package frozen strawberries, thawed
> 1 (12 ounce) container frozen whipped topping, thawed
> Check All Add to Shopping List .Directions
> 1.Prepare pudding with milk according to package directions. In a
> trifle bowl or other glass serving dish, layer half the cake pieces,
> half the pudding, half the bananas, half the strawberries and half the
> whipped topping. Repeat layers. Cover and chill in refrigerator 4
> hours before serving.

Almond Roca Cream wine


 A recent trip to the Costco in Bellingham resulted in this little find. $4.97 for a bottle of Almond Roca Cream. When I picked it up, I thought, "Oh, this is like Irish Cream! This will be a fantastic addition to a nice cup of coffee or tea. And at $5, what a STEAL!". When I was checking out, I finally noticed it went through as a wine. WTF?! cream and wine? That sounds gross. No wonder it was on clearance. I was really hesitant about trying this. The hubby opened it and we drank it out of a couple of wine glasses. The verdict? Not baaaaad... in fact, it could still go into a tea or coffee and it was just like Irish cream. Whoever is in their marketing department should be fired though. If they hadn't put "cream" and "wine" on the bottle, I'm sure they would have sold a lot more and wouldn't sadly be on clearance at a Costco. It's got quite the alcohol content (14%) and a nice creamy toffee scent to it. Alone it's drinkable although I think paired with a good coffee or Trader Joe's vanilla cinammon tea and you've got a sure winner.

Seriously. When you say "Almond, Chocolate and  Toffee cream", you just want to guzzle it and whip it up in some frosting and have it on cupcakes. But throw "wine" in there and you think of curdling and want to barf. Thank God for bad marketing people otherwise it would have been priced higher and I never would have bought it. This bottle will be finished for sure and totally worth $5.

Raspberry souffles

Voila! Raspberry souffles!
So from my previous post, I had embarked on a quest to make homemade mayonnaise. That uses a lot of egg yolks which leaves you with lots of leftover egg whites! What to make? A quick search on google resulted in: Angel food cake (Nica and Ariana don't eat cake fast enough in this house); pavlovas (already made those a few weeks ago and still have some left);  creme brulee (too much dairy); and souffles. Hmmm. Souffles. Further googling (yes, I just verbed that) demonstrated that I could make a sweet souffle. How delicious did that sound?! The first recipe I came across was a strawberry souffle but strawberries aren't in season and I didn't have any in my house. But further searching landed me on this recipe: Raspberry souffles. I had frozen raspberries to use up in the freezer.

I chose this recipe to follow since it had the world "fool" in it: http://www.bbc.co.uk/food/recipes/foolproofhotraspberr_12919

Can't go wrong if fools can make it, right?


Ingredients

  • 250g/9oz raspberries
  • 4 eggs, whites only
  • 100g/4oz caster sugar
  • juice of half a lemon
  • ½ tsp cornflour, lightly dissolved in a few spoonfuls of water

Preparation method

  1. First, evenly butter and sugar ovenproof moulds for the souffles and place in the freezer.
  2. For the coulis, add half of the sugar to the raspberries. Place in a hot pan and cook quickly for 2-3 minutes with a good squeeze of lemon juice.
  3. Liquidise with a hand blender and pass through a sieve to remove the seeds.
  4. Place 2 tsp of coulis in the bottom of the souffli dishes and thicken the remaining coulis with the moistened cornflour.
  5. For the meringue, ensure the whisk and bowl are free from grease by scalding in boiling water.
  6. Place the egg whites in the bowl and start to whisk.
  7. mixing the raspberry base and beaten egg whites together
    Gradually add sugar until a smooth soft peak is obtained.
  8. Add a good squeeze of lemon juice at the end.
  9. For the souffli, take a third of the meringue and whisk into the thickened coulis.
  10. Lightly fold in the remaining two thirds. Do this gently so the air is not knocked out of the mix.
  11. Divide the mix between the dishes.
  12. Smooth the surface of the souffli and trim edges with your thumb.
  13. When ready to bake, space out on a tray and bake in a medium to hot oven (180C/350F/Gas 4) for approximately 10-15 minutes depending on the size and dish.
  14. Dust with icing sugar, place a raspberry on top and serve immediately.

The end result were beautiful souffles. I didn't scrape the tops flat so yes, they were lopsided but when they come out all billowy and tall, you want to do a tiny dance (but lightly of course since we're dealing with souffles here).


These were really really sweet so next time I think I'll cut down on the sugar. I froze four of them since it says you can freeze them and then just toss them in the oven to make them lift again so we'll see how that goes tomorrow. The great thing about this is that they're gluten and dairy free so a fantastic dessert for those that have those dietary considerations. I still have more egg whites left so the next adventure will be savoury souffles. Mmmm.

The quest for homemade Mayonnaise

I had a tea date with my friend Carol and I offered to bring the sandwiches. I mulled for days over what kind I would make. I finally decided on cheese and onion; egg salad; smoked salmon with cream cheese; chicken salad and cream cheese and cucumber. Unfortunately, many things worked against me:
1. I didn't have time to prepare the night before
2. Ariana stayed up late so didn't wake up until late so we were 1.5 hours late for our 10:30 date
3. Nica ate all the mayonnaise.

Say what?! ALL the mayonnaise you say? yup. All of it. And it was boxing day so a lot of shops were closed. But have no fear. I had eggs. 5 of them. I had watched loads of youtube videos about making homemade mayonnaise. How hard could it be since I have a fancy new food processor (Merry Christmas to me).

Well, it's hard.

Attempt #1 after watching Gordon Ramsay make it on youtube:
Result: FAIL. I put three egg yolks and a bit of dijon mustard in the food processor. Whirred it for a bit and then added sunflower oil VERRRRRRRRY slowly. The end result was a gross mess. Super runny and it didn't emulsify. Tossed it down the toilet. Figured I must have added the oil too slowly and overwhipped it.

Attempt #2 after watching this guy on youtube:
Result: FAIL again in the food processor. I used up one more egg. Still runny and gross. Tossed it down the toilet.

Attempt #3 after deciding I would hand mix it and use lemon juice instead of mustard to stabilize the yolks initially. I whisked and whisked. The husband at this point had woken up. He tried to give me advice by telling me how it didn't look right and it was too runny and how I should whisk it until it was thicker. Lemme tell you something... NOT helpful! Well, definitely not helpful when I'm down to my last egg, my last bit of sunflower oil and out of time for a lunch date. So I threw it all at him and told him to do it and retreated to my bedroom. Yes, I am that mature. He came in a little while later and you know what? He had beautiful mayonnaise in the bowl. I reluctantly took it and mumbled thanks and went on making my sandwiches (clearly I didn't have any eggs leftover for egg sandwiches so I just used it for the chicken salad instead). The husband tried to tell me that the secret was whisking in the same direction. I thought that was total baloney since it really shouldn't make a difference what direction you whisk it in. Eggs are eggs. At the molecular level it doesn't care which direction it's being beat from.

Successful thick mayonnaise!
So a few days later I found myself needing mayonnaise again. I am lazy enough that I wanted to try an appliance to make this stuff so I didn't have to use my arm muscles whisking. The food processor was getting one last chance. I added two eggs and a splash of lemon juice and dijon mustard and watched the processor go. This time I watched it more closely to see if it was actually mixing everything together. And... it wasn't. I have an 11 cup food processor and the blades weren't reaching the yolk/juice/mustard mixture. It was just splashing it around or just beneath the blade. So I tossed in another yolk to see if the slightly larger volume would help the blades grab it. Nope.

Beater Blade
So I scooped everything out of the food processor and put it into my kitchenaid mixer bowl. Used the wire whisk attachment and turned it on. Still not enough volume for the whisk to grab onto the liquid. So I took it off and whisked it by hand while slowly adding the sunflower oil. Much better. By hand seemed to do the trick. When the volume had increased enough, I thought I'd try the stand mixer again. The whisk attachment seemed kind of useless so I used the flat beater instead. Worked beautifully - I could control the whisking speed and it picked up all the mix. I should note that I don't ever use the Kitchenaid flat beater that comes with the stand mixer. I bought this after market beater blade that has silicone sides that help scrape food along the sides of the bowl for thorough mixing and it is worth every penny I spent on it (~$30).

I am definitely going to try this again with my kitchenaid in the future and forget about the food processor. That appliance is awesome, but not for mayonnaise.


Garlic Parmesan pull apart bread

I kept seeing all these post about pull apart bread on Pinterest (damn you, Pinterest) so last night I finally gave in and tried one out since I was making chicken soup for dinner. Here is a recipe for Garlic Parmesan pull apart bread:  http://smells-like-home.com/2012/09/garlic-parmesan-pull-apart-bread/

Garlic Parmesan Pull-Apart Bread
source: adapted from Pastry Affair
Ingredients:
  • 2 1/4 tsp (1 packet) instant yeast
  • 1 1/3 cups warm water
  • 2 tbsp extra-virgin olive oil
  • 2 tsp salt
  • 3 1/2 cups all-purpose flour
  • 4 tbsp (1/4 cup) salted butter, melted
  • 1 tbsp dried parsley flakes or 2 tbsp fresh parsley, finely chopped
  • 1/4 tsp Italian seasoning
  • 2 cloves garlic, minced
  • 1/4 cup freshly grated Parmesan cheese
Instructions:
The dough after the first proof
Butter, parsley, seasoning, and mmmm garlic!
  1. In the bowl of the stand mixer, stir together the yeast and water. Let the mixture sit for 5 minutes until yeast is somewhat dissolved. Mix in the olive oil, salt, and flour. Using the dough hook, knead the dough for 5 minutes, or until elastic. (Alternatively, you can mix the ingredients in a large bowl then knead the dough on a lightly floured surface until it is elastic, 7-10 minutes.) Transfer dough to a lightly oiled bowl and cover with a clean kitchen towel or plastic wrap. Allow the dough to rise for 1 to 1 1/2 hours, or until it has doubled in size.   
 2. In a small bowl, combine melted butter, parsley, Italian seasoning, and minced garlic. Set aside.

 
3. Preheat oven to 350 degrees F.


Ready to go in the oven
4. Gently push the air out of the dough. Tear off a golf ball-size piece of dough, roll in the butter mixture, and place in the bottom of a Bundt pan. Repeat this process until you have one layer of dough balls. Sprinkle on 1/3 of the Parmesan cheese. Continue layering the dough balls and cheese until you have 3 layers. (Note: We ended up with only 2 layers but the bread still turned out fine.) Cover the pan with a clean towel or plastic wrap and allow the dough to double in size, 20-30 minutes.
    5. Bake for 25 to 30 minutes, or until bread is golden brown. Let the pan cool on a wire rack for 5 minutes then invert the pan onto a large serving plate and let the bread fall out of the pan.  Serve hot.
the end result
My notes: Since you have to proof it twice, it actually took a lot longer than I thought it would. But with my Kitchenaid mixer, this recipe was a snap. And fresh out of the oven? Heaven and loveliness. I modified the recipe by putting FOUR (yes, count them FOUR) cloves of garlic because the husband is Romanian and a bigger garlic lover than I (who would have thought it possible, but it is). I also used Trader Joe's romano parmesan instead of fresh because I was too lazy to actually grind it up in the food processor. I'm not sure if I had "Italian seasoning" (it's an Italian spice mix), so for good measure, I threw in a few dashes of Johnny's Garlic spread and seasoning. I use that stuff on EVERYTHING (goes great with roasted potatoes) and available at Costco in of course, Costco-size.

I don't own a bundt pan so I used my tube pan instead. Hopefully I didn't ruin it by spraying Pam all over it. It didn't make three layers of dough, just one and a few balls in the second layer. Still took about 20 minutes to bake.

The end result was a little salty but tasty! It was fun pulling it apart and dipping it into our soup. To store, I put in a plastic bag and knotted the top to seal the air out. Had another piece today and it's still soft and lovely and yes, very garlicky. Will make this again but will consider using another pan instead of the tube pan. Maybe a loaf pan instead?

Thursday, December 27, 2012

Chateau Doisy-Vedrines


Mela came back from Bordeau a month ago and of course, she returned with wine. This is a bottle that she shared with me a 2002 Chateau Doisy-Vedrines. When she saw the cork, she said the Grand-Cru stamp meant that it was an excellent vineyard. A quick wiki search returned the following:

"
Grand cru (French for great growth) is a regional wine classification that designates a vineyard known for its favorable reputation in producing wine. Although often used to describe grapes, wine or cognac, the term is not technically a classification of wine quality per se, but is intended to indicate the potential of the vineyard or terroir. It is the highest level of classification of AOC wines from Burgundy or Alsace. The same term is applied to Châteaux in Saint-Émilion, although in that region it has a different meaning and does not represent the top tier of classification. In Burgundy the level immediately below grand cru is known as premier cru, sometimes written as 1er cru.[6]"

 I don't by any means have a sophisticated enough palate to distinguish what made it a good wine, but it was tasty. Very flavourful and very sweet. Like crazy sweet. Although it smelled like brown sugar, it also had a high alcohol scent and the lines on the glass told me that probably wasn't far from the truth. But it didn't taste like it. The husband said it reminded him of the top of a creme brulee. Mela drank three glasses. It was delicious and I felt honored that she would share it with me. A great wine with an acidic or spicy pairing (I unfortunately only had triple lemon biscuits from TJ's and wasabi seaweed) but it wasn't bad.

Monday, December 24, 2012

Fuzion

 Christmas season = Family time, vacation, work parties and... Secret Santa gift exchanges. This year was a bit ridiculous for me. Since I switched jobs halfway through the year and my new job has a team, a department and building party planning committees, there was a ridiculous amount of holiday festivities.

A safe bet if you're doing a secret santa gift swap with gift stealing is booze. To give or to receive. (Lotto tickets also work well but I find booze to be more instantaneously fulfilling). Anyway, I ended up with this bottle of fuzion. I expect it was under $15 since that was the max amount for our exchange. At two separate gift exchanges it showed up so I figure it must be a pretty decent wine.

Being a blend of Shiraz and Malbec, you'd expect something typically spicy. Surprisingly, it was quite smooth and mellow. An easy to drink wine that would pair well with a steak dinner. I had it on its own and it wasn't 'OHMIGOD, this is AMAZING', but a nice 'I could drink this again'. I might even buy it if I were going to a friends house for dinner. 8 out of 10.

Lemony Lemon Brownies

Damn you, Pinterest. It's visual crack and I can't stop pinning!

A friend Victoria recently pinned a recipe for "lemony lemon brownies". Sounds gross, right? Brownies to me mean chocolate. Don't worry - this recipe doesn't have any of that. It's more a lemon-bar, really. Anyway, wanted to bake something to take to a Christmas party and this recipe seemed super simple.

The original recipe site:
https://sites.google.com/site/beckycharms/cakies/lemony-lemon-brownies


The "Brownie" Batter
3/4 cup all-purpose flour {King Arthur All-Purpose Flour}
3/4 cup granulated sugar
1/4 teaspoon salt {Sea Salt}
1/2 cup (1 stick) unsalted butter, softened
2 large eggs
2 tablespoons lemon zest
2 tablespoons lemon juice

Tart Lemon Glaze
1 rounded cup powdered sugar
4 tablespoon lemon juice
8 teaspoons lemon zest

Preheat oven to 350°F. Grease/Spray an 8-by-8-inch baking dish with butter/cooking spray and set aside. 

Zest and juice two small/large lemons; set aside. {whatever you have}

In the bowl of an electric mixture fitted with the paddle attachment, beat the flour, sugar, salt, and softened butter until combined. 

In a separate bowl, whisk together the eggs, lemon zest, and lemon juice until combined. Pour into the flour mixture and beat at medium speed until smooth and creamy, about 2 minutes. 

Pour into baking dish and bake for 23-25 minutes, or until just starting to turn golden around the edges and a toothpick inserted into the center of the brownies comes out clean. Allow to cool completely before glazing.  Do not overbake, or the bars will be dry. {even with the yummy glaze}

When brownies are cooled completely, make the glaze...sift the powdered sugar, add lemon zest and juice, and whisk together all three ingredients. Spread 1/2 the glaze over the brownies with a rubber spatula.  Let glaze set.  Spread the remaining glaze over the bars, and let it set.  This glaze does not harden like most.  Cut into bars, and serve!


The batter looked heavenly after it was mixed. I wanted to eat the whole thing! It was like whipped lemon heaven. 


Unfortunately, I don't own an 8x8 pan only a 9x9 one and so the end result was kind of thin (like a little over a cm) after about 18 minutes. It didn't rise any. I used a silicone pan which made the brownie/cake tear when I popped it out. The glaze was runny (as warned) and it took about 4 small lemons to make it. Anyway, I used one of those flat scrapers to try and cut it and what a mess that made. I switched to a pizza cutter about 3/4's of the way through and that was a much, much better idea. Less mess and clean cuts!
 
The husband said it was tasty and my 2 year old toddler kept sneaking in and taking them. The people are the party I went to gave it high reviews too. Next time I make it I'd like to try and find a smaller pan.

Update March 3 2013: I've made this three more times since my initial attempt. I use my rectangular baking pan lined with parchment paper which works a lot better. Especially since I can just lift the parchment and put into a re-purposed chocolate tin. 

The first time I took it to a friend's house for her Oscars party. Either the lemons weren't super fresh or I stored them too close to a squash or used a knife that I had used to make squash soup (which I admit I made that same day), because it had a squashy flavour about it. Or maybe it was just the piece I got? One guy couldn't stop eating them. Nica said the last time I made them the bars were better.

The second time I took them into work. Weren't bad. I think I still overcooked them by a minute but the frosting really saved it. I selectively gave them out so had leftovers and when Nica and I ate them a couple of drunken nights later they were AWESOME. 

The third time I made them I used Trader Joe's gluten-free flour which you can use "cup for cup like real flour".  I wasn't sure of the chemistry of everything because after beating the butter, flour, sugar and salt, the resulting mixture was more solid and moist than crumbly like it normally is with regular flour. And after adding the lemon and egg mixture, it wasn't fluffy and creamy and almost looked like the lemon curdled. But I baked it anyway and it turned out super moist!  Thumbs up gluten-free recipe and in fact, I think I almost prefer it to the regular flour kind. Upping the rating from 8.5 to 9 out of 10. 

So my tips with this recipe?
* Use parchment paper to line whatever you're baking it in. Easier to transfer out of the pan (and clean), easier to hold in the glaze and easier to cut.
* Use a pizza cutter to slice the cake.
*  I used a KitchenAid mixer to mix everything. Probably not a tip since I'm sure you can still use an electric beater. I just wanted to point out that you don't HAVE to.
* You will need 6 (small) lemons to make this recipe and you will have leftover juice that you can freeze in ice cube trays for future use. 2 lemons for the cake, 4 lemons for the icing.

This is a super simple recipe that I can even get my toddler involved in. The hardest part is getting the rind off the lemons.

Saturday, December 1, 2012

Ultimate meringue recipe

Going to a dinner tomorrow night and I can't have dairy and my sister can't have gluten. What to make?!!!

Meringue to the rescue! Trying this recipe out tonight: http://www.bbcgoodfood.com/recipes/2445/ultimate-meringue

I googled the conversion between grams and cups for the caster sugar and icing sugar but I might just break out my digital scale to make sure.
Ultimate meringue
  • 4 large organic egg whites , at room temperature
  • 115g caster sugar (a little over 1/2 cup)
  • 115g icing sugar (a little over 1 cup)

Method

  1. Preheat the oven to fan 100C/ conventional 110C/gas 1⁄4. Line 2 baking sheets with Bake-O-Glide non-stick liner or parchment paper (meringue can stick on greaseproof paper and foil).
  2. Tip the 4 large egg whites into a large clean mixing bowl (not plastic). Beat them on medium speed with an electric hand whisk until the mixture resembles a fluffy cloud and stands up in stiff peaks when the blades are lifted.
  3. Now turn the speed up and start to add 115g caster sugar, a dessertspoonful at a time. Continue beating for 3-4 seconds between each addition. It's important to add the sugar slowly at this stage as it helps prevent the meringue from weeping later. However, don't over-beat. When ready, the mixture should be thick and glossy.
  4. Sift one third of the 115g icing sugar over the mixture, then gently fold it in with a big metal spoon or rubber spatula. Continue to sift and fold in the remaining icing sugar a third at a time. Again, don't over-mix. The mixture should now look smooth and billowy, almost like a snow drift.
  5. Scoop up a heaped dessertspoonful of the mixture. Using another dessertspoon, ease it on to the baking sheet to make an oval shape (pic 3). Or just drop them in rough rounds, if you prefer. Bake for 1 1⁄2-1 3⁄4 hours in a fan oven, 1 1⁄4 hours in a conventional or gas oven, until the meringues sound crisp when tapped underneath and are a pale coffee colour. Leave to cool on the trays or a cooling rack. (The meringues will now keep in an airtight tin for up to 2 weeks, or frozen for a month.) Serve two meringues sandwiched together with a generous dollop of softly whipped double cream.

Strawberry layer cake with whipped strawberry frosting

There's a lady at work who makes AMAZING cakes. I'm going to nickname her the cake lady. She brought one in the other day for someone's birthday and it was delicious - strawberry cake! It wasn't super light and had a heavy texture about it but I thought the strawberry taste might be a hit with kids. She forwarded me the recipe and here it is. Who would have thought - jello in a cake mix!

Yield: One 3-layer, 8-inch round cake
Ingredients
For the Cake:
  • 1-3/4 cups (350 g) granulated sugar
  • 1 (85 g) package strawberry flavored gelatin (such as Jell-O)
  • 1 cup (227 g) unsalted butter, softened
  • 4 eggs (room temperature)
  • 3 cups (300 g) sifted cake & pastry flour
  • 1 tablespoon (15 g) baking powder
  • 3/4 teaspoon (5 g) salt
  • 1 cup (240 ml) whole milk, room temperature
  • 1 tablespoon (15 ml) pure vanilla extract
  • 1/4 cup (60 ml) strawberry puree made from frozen strawberries (puree itself should be closer to room temp, not frozen or icy)
For the Frosting:
  • 3 sticks + 2 tablespoons (375 g) unsalted butter, softened and cut into cubes
  • 4 cups sifted (500 g) confectioners' sugar (icing, powdered), sifted
  • 1 tablespoon (15 ml) milk
  • 1-1/2 teaspoon (7.5 ml) pure vanilla extract
  • pinch of salt
  • 3 tablespoons (45 ml) strawberry puree made from frozen strawberries (if you want the frosting seed-free, you can put the puree through a sieve before adding to frosting)
Instructions
For the Cake:
  1. If you're making your own strawberry puree, remove frozen strawberries (about 2 handfuls) from freezer and place in a single layer in a flat dish to thaw slightly. Place into food processor and puree the strawberries until smooth. Stir to ensure it is nice and smooth and not icy. Measure out 1/4 cup for cake and 3 tablespoons for frosting, and freeze the remaining puree for another use.
  2. Preheat oven to 350°F. Butter, line with parchment, and flour three round 8-inch pans, tapping out the excess. Set aside.
  3. In a medium bowl or measuring cup, combine and stir the milk, strawberry puree, and the vanilla. Set aside. Sift and whisk dry ingredients together in a medium bowl, and set aside.
  4. In the bowl of an electric mixer fitted with the paddle attachment, cream the sugar, gelatin, and butter on medium speed until light and fluffy, about 5 minutes.
  5. Add the eggs, one by one, mixing well after each addition and scraping down the sides of the bowl with spatula.
  6. Add the wet & dry ingredients to the creamed mixture by alternating--beginning and ending with dry ingredients and mixing just enough after each addition to incorporate, but not over-mix.
  7. Divide the batter in three, spreading it evenly with a small offset palette knife. If you have a kitchen scale, weigh each pan filled with batter, to ensure 3 even layers. Bake 25-30 minutes or until a cake tester comes clean when inserted into the center. Be so careful to not over-bake. Check cakes at 20 minutes, but not before, and once you feel it's almost ready, set the timer for 2 minute intervals. Let cool on racks for 10 minutes before loosening the sides with a small metal spatula, and invert onto greased wire racks. Gently turn cakes back up, so the tops are up and cool completely.
  8. Wrap tightly and store at room temperature for up to 2 days, refrigerator for up to 5 days, or frozen for up to 2 months. Best eaten day one.
For the Frosting:
  1. In the bowl of an electric mixer fitted with the paddle attachment, whip butter for 8 minutes on medium speed (I use "4" on my KitchenAid). Butter will become very pale & creamy.
  2. Add remaining ingredients, except strawberry puree, and mix on low speed for 1 minute, then on medium speed for 6 minutes. Frosting will be very light, creamy and fluffy. Add strawberry puree (can be cool, but not frozen or icy) and mix until incorporated.
Assembly of the Strawberry Layer Cake with Whipped Strawberry Frosting:
  1. Place a cake layer face-up on cake plate or 8" round thin cake board. Place 1 cup of frosting on top, and spread evenly with a small offset palette knife.
  2. Repeat until you come to final layer and place final layer, face-down. Place a generous scoop of frosting on top, spreading evenly with a small offset palette knife and working your way down the sides until you have a thin layer of frosting over the entire cake. Use a bench scraper to achieve very smooth sides. Chill until set, about 30 minutes.
  3. Remove from refrigerator and cover with a final layer of frosting. Finish with any decorations of choice, or frosting borders.

NOTES:
** The icing on my cake was slightly different from this recipe.  I added a brick of white bakers chocolate to the Frosting recipe.  Melt the chocolate in the microwave (should take about 45 seconds).  Allow it to cool down but not harden.  Make the frosting as per instructions and the gradually add the white chocolate in.  Mix well.  This frosting will be soft, but once refrigerated it will be stiff.
** You may need to double the recipe for cupcakes as this cake does not really rise.  Usually you would fill the cupcake tins ¾ full.  For this recipe, fill the cupcake cups closer to the top. 

Your icing color will look pale pink like this.  To add color, use gel paste coloring.  If you use the liquid coloring, you may need to add a bit more icing sugar to the frosting.
http://sweetapolita.com/wp-content/uploads/2011/08/openstrawcake-680x1024-e1351720464258.jpg