Showing posts with label To try again. Show all posts

Sunday, March 3, 2013

Homemade Crumpets

I like crumpets. They remind me of my mother who use to have them with butter and jam. So when I came across this recipe on Pinterest, I read through it, realized I had all the ingredients and figured I'd give it a shot.

Ingredients:
3 Packages Active Dry Yeast
3/4 Cup Warm Water
3 Teaspoons Sugar
1 Cup Warm Milk
3 Eggs
3 Cups All Purpose Flour
1 Teaspoon Salt
Butter
Makes 25 Crumpets*

1. Mix the Yeast, Warm Water and Sugar in a glass bowl.  Let the yeast "proof" (get foamy) for 5-10 minutes. 


2. Into the Yeast mixture, whisk the Warm Milk, Flour, Eggs and Salt until no longer lumpy.  Cover with a towel and let rise for 30-45 minutes.

3. Cut 1/2 Tablespoon of butter and melt it on your griddle/frying pan at Medium-High Heat.  Scoop out about 4 Tablespoons of batter and pour it on to your griddle for each crumpet.  You can "eye" it up - pour enough batter to make the size of crumpet you'd like! 

4. Cook the crumpets on one side until they bubble through and appear mostly dry on the tops.  Then, flip them and cook for another 15 seconds

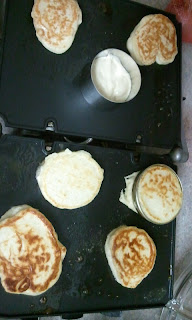
So this is what mine looked like:
Sorry, blurry picture of the batter - very elasticy
crumpets on the griddle.

They were ugly but tasted ok and we didn't need to freeze any because we all ate them within the next few days. I wish I had my homemade butter to go with it.

I tried making some in a circular form I had but it was impossible to pop it out without having some of the batter cake to the sides. I even tried a mason jar lid that someone on the blog had suggested. I gave up on that idea.

While making them, they reminded me of mini-pancakes. The yeast I used had expired back in December but it still foamed. I wonder what the results would have been like if I had used fresh yeast.

Wouldn't mind trying this recipe out again. Maybe with lactose-free milk (or maybe even leftover buttermilk from making real butter) and gluten-free flour.

Monday, December 19, 2011

Starbucks Cranberry Bliss Bars

Well Sandy has done it to me again. She has introduced me to a new food that I can't get enough of! We went for coffee the other day at Starbucks and she convinced me (didn't take very much, mind you) to buy a Cranberry Bliss bar.

OMG, it was DIVINE. I meant to share it but ended up eating the whole thing.

I found this website that has the "secret recipes" to everything. Here is the one for Starbucks' cranberry bliss bar:

Cake
3/4 cup (1 1/2 sticks) butter, softened
1 1/4 cups packed light brown sugar
3 eggs
2 tablespoons minced crystallized ginger
1 1/2 teaspoons vanilla extract
1/2 teaspoon salt
1 1/2 cups all-purpose flour
1/2 teaspoon baking powder
3/4 cup chopped sweetened dried cranberries
4 ounces white chocolate, cut into chunks

Frosting
4-ounces cream cheese, softened
3 cups powdered sugar
4 teaspoons lemon juice
1 teaspoon vanilla extract

1/4 cup chopped sweetened dried cranberries

Drizzled Icing
1/2 cup powdered sugar
1 tablespoon milk
2 teaspoons vegetable shortening


1. Preheat the oven to 350 degrees F.

2. Make cake by beating the butter and brown sugar together with an electric mixer until smooth. Add the eggs, ginger, vanilla, and salt and beat well. Gradually mix in the flour and baking powder until smooth. Mix the chopped dried cranberries and white chocolate chunks into the batter by hand. Pour the batter into a buttered 9 x 13-inch baking pan. Use a spatula to spread the batter evenly across the pan. Bake for 25 to 30 minutes, or until the cake is lightly browned on top. Allow the cake to cool.

3. Make the frosting by combining the softened cream cheese, powdered sugar, lemon juice, and vanilla in a medium bowl with an electric mixer until smooth. When the cake has cooled, use a spatula to spread the frosting over the top of the cake.

4. Sprinkle 1/4 cup of chopped dried cranberries over the frosting on the cake.

5. Make the drizzled icing by whisking together powdered sugar, milk, and shortening. Drizzle this icing over the cranberries in a sweeping motion with a squirt bottle or fill a small plastic storage bag with the icing and cut off the tip of one corner.

6. Cover the cake and let it chill out in the fridge for a couple hours, then slice the cake lengthwise (the long way) through the middle. Slice the cake across the width three times, making a total of eight rectangular slices. Slice each of those rectangles diagonally creating 16 triangular slices.

Makes 16 bars.

I have no idea where to buy crystallized ginger. I know Trader Joes sells it but the last couple of times I've gone down, they've been out of stock. One of the staff told me there was an issue with their packaging. d'oh!! I can't WAIT to try this recipe out.

Update December 20, 2011: 
I made this after finding crystallized ginger at my local Save-On-Foods. It wasn't bad but it was so SWEET! It seriously hurt my tooth when I ate it. Nica kept sneaking into the fridge to eat it. I meant to take some into work but by the time I went to plate it, it was half gone. *sigh* I did let a couple girls at work try some since I took one piece in as an after-lunch snack and they said it was really good. Not sure if they were just saying that though.

Things to remember for the next time I make this: 
* I cut a hole much too large when I was covering it with the drizzled icing. I think I could have skipped that part of the bar entirely and it would have been fine. 
* The entire bar was WAY too sweet. Next time, I will definitely cut back on the sugar. 
* Don't put crystallized ginger in the mini food processor. The ginger gets caught in the blades and just makes it a gooey mess. I'm guessing it would be ditto for the cranberries although I smartened up and chopped them with a french knife after the ginger fiasco.
* line the baking pan with parchment paper to prevent it from sticking to the sides.

Interestingly, it seemed to taste a lot better after a few days in the fridge and then eaten at room temp.

Friday, August 12, 2011

Cherries Galore!

I've recently come into possession of a sh*tload of cherries. I'm talking a good 10 lbs of them. I love cherries (even though I had an unfortunate reaction to them during my pregnancy) but now I have no idea what to do with them.

Yesterday I made a cherry pie from this website: http://www.joyofbaking.com/printpages/CherryPieprint.html

The result was... well, it tasted ok (my friends even went back for seconds) but I was so embarrassed. It wasn't as thick as I would have hoped and there was cherry liquid everywhere! I'm thinking the "Tapioca starch" I bought wasn't the same as "quick cooking tapioca" the recipe called for. My dad tried it and loved it. He gave it a 9 out of 10 and had three pieces. I'm thinking next time I'll find a different recipe that uses flour or starch instead of this "quick cooking tapioca" (whatever that is).

Anyway, here are some of the highlights of my cherry pie making experience:
1. I don't own a cherry pitter. However my brother-in-law Zac (who wins pie making contests!) told me that a chopstick works just as well. That way,  you can "feel" the pit before you push it through and it makes less of a mess. My experience? It went fabulously! I did get cherry juice all over the hand that was holding the cherry but a pretty simple task. Just pull off the stem, insert the chopstick into the stem end, feel around for the pit and then push.

2. The crust is key. I used the tenderflake recipe on the back of the box but instead of water, I used vodka. That's right. booze! My brother-in-laws secret to an amazing flaky crust. Sorry Zac. Secret's out!

3. Transporting a leaky pie. I'm not kidding when I tell you cherry juice was everywhere. I wasn't sure how i was going to transport it to my friend's house. Then I looked around and found an empty sushi tray. You know, one of those huge round ones? Perfect for transporting in my car. It did get a little messy but at least I didn't have cherry juice on the fabric of my car seats.

Unfortunately, I didn't take any photos of the pie. Tonight I'm going to attempt cherry crisp so I'll be sure to snap a few then!

Monday, August 30, 2010

Caesar Salad Dressing

I'm on the hunt for a good Caesar salad dressing recipe. So far, memorable dressings have included Mike's homemade dressing (but he never parted with the recipe) and the dressing at Santali's Greek restaurant in New Westminster. Also homemade but the owner won't give the recipe out either.

Tomorrow I'm going to attempt my first homemade caesar salad dressing. I think the secret to making one similar to the one I had at Santali's is anchovy. So, I'm going to try this recipe I found on the food network:
link: http://www.foodnetwork.ca/recipes/Salad/Vegetables/recipe.html?dishid=5594

Ingredients
Roasted Garlic

* 1 head roasted garlic (see below)
* 1 tablespoon vegetable oil (15 mL)

Dressing

* 2 cloves garlic
* 2 anchovy fillet
* 2 tablespoons capers, drained and rinsed (25 mL)
* 1/2 teaspoon Dijon mustard (2 mL)
* 1 tablespoon lemon juice(15 mL)
* 1/4 teaspoon Worcestershire sauce (1 mL)
* 1/4 cup (50 mL) vegetable oil
* 2 tablespoons low fat mayonnaise (25 mL)
* 1/4 teaspoon freshly ground black pepper (1 mL)
* 1 head romaine lettuce, outer leaves removed
* 1/4 cup freshly grated or shaved parmesan (50 mL)


Directions
Roasted Garlic

1. Preheat oven to 375 degrees F (190 C).
2. Slice stem end off garlic. Place on a sheet of aluminum foil. Drizzle with the oil. Wrap garlic and place on a baking sheet. Bake for 35-45 minutes or until softened. This can be done ahead up to one day ahead. Let cool.

Dressing

1. In the bowl of a food processor, pulse roasted garlic, raw garlic, anchovy, and capers.
2. Process until finely minced. Add Dijon mustard, lemon juice and Worcestershire sauce. With motor running, slowly drizzle in vegetable oil and finish with mayonnaise to achieve a creamy consistency.
3. Season with black pepper and salt if needed, to taste.
4. In a large bowl, tear lettuce into bite size pieces, Add dressing, croutons, and cheese to the bowl, and toss well.

Wish me luck!

Sunday, October 11, 2009

Cranberry Bonanza

Nica worked an event a couple weeks ago where some guy had a cranberry stand. At the end of the night, he decided it was too much of a hassle to take all the cranberries back so all the techs took a box home. Nica, bless his Chinese-influenced-soul, decided to take 2 boxes. I don't know why because I never ever cook with cranberries and these were honking huge boxes. I gave one to my sister and the other to work for all to take for Thanksgiving. I did keep a few, since all my colleagues started coming up with cranberry recipes. Here's one that I tried:

Cranberry Orange Loaf

By The Canadian Living Test Kitchen
33 people added this to their Recipe Box

Tested Till Perfect

The combination of cranberry and orange makes this loaf from food writer Carol Ferguson absolutely delicious.

Servings: 1 loave, 16 slices
Ingredients:

1 orange
2 cups (500 mL) all-purpose flour
1 cup (250 mL) granulated sugar
1 1/2 tsp (7 mL) baking powder
1/2 tsp (2 mL) baking soda
1/2 tsp (2 mL) salt
1 cup (250 mL) chopped cranberries (fresh or frozen)
1 egg, beaten
1/4 cup (50 mL) butter, melted

Preparation:
Grate rind from orange. Squeeze juice into liquid measure; add enough water to make 3/4 cup (175 mL). Set aside.

In large bowl, whisk flour, sugar, baking powder, baking soda, salt and orange rind; stir in cranberries. In small bowl, whisk together egg, butter and orange juice; stir into flour mixture just until blended. Spread in greased 9- x 5-inch (2 L) loaf pan.

Bake in centre of 350°F (180°C) oven for 50 to 60 minutes or until cake tester inserted in centre comes out clean. Let cool in pan for 10 minutes; turn out onto rack and let cool completely. Wrap and let stand for 12 hours before slicing. (Make-ahead: Store at room temperature for up to 2 days or overwrap with heavy-duty foil and freeze for up to 2 weeks.)

I made this recipe for my family Thanksgiving dinner and it was a little bread-y but it was nice and moist and not too bad! It was a little crumbly though. Would definitely try it again and maybe add another egg to try and bind it better.

Sunday, August 30, 2009

Cooking website

After months and months of wanting a pasta maker, I finally bought one last week. I'll put a separate review of my experience with that.
In preparation for my first pasta-making experience the geek in me decided I would try and learn how to do it online first. I ended up stumbling upon this website:
http://rouxbe.com/?l=t

TOTALLY awesome instructional videos with lots of different 'how-to's'. I only browsed through it as a guest but they have everything!!! What's great is that they actually show you both what you should look for and what you shouldn't. Most places only show you what you should see, so you never know if you've done something wrong.

Maybe one day I'll buy the full subscription but for now I'm satisfied with all the free videos that they offer.

Show me dem Mussels!

About a week and a half ago, Nica and I took this one-day French cooking course at this place called "Cookshop" in City Square. All Summer long they had 2 for 1 classes so for the two of us, it only cost $99. http://www.cookshop.ca/store/

So essentially what happens is that you're in the class with a bunch of other people. There's a demonstration area at the front of the class, and a series of tables in front of that. Each table has a portable stovestop on it, with the ingredients for whatever dish you're going to make. In our class, we were going to learn how to make 7 different dishes from the French Brittany region. I initially thought that we were going to make all 7 ourselves (just Nica and I) but I learnt that each couple would prepare one of the dishes, and then we'd all share together at the end of it.

It was a bit of a gong show. The chef was good in coming around to each one of our tables and showing us the cooking technique for our own dish. Sometimes he'd call everyone over to watch what he was doing but since you were cooking for everyone, you didn't want to abandon your station and ruin the food. So I did miss a few demonstrations. I didn't leave with the comfort of knowing how to cook the other dishes so I probably wouldn't do a participation class again.

My review aside, we have put to use some of the recipes he gave us. Last night we enjoyed the Steamed mussels with White Wine, Shallot and Parsley. In the class my friends Janine and Cam made this. They said it was super simple so we thought we could give it a try too. I picked up a bag of mussels from Costco and had enough to make this dish twice: once for ourselves and again last night with another couple, Flo and Scott.

Here's the recipe:

4 1/2 pounds of mussels, scrubbed with the beard removed
1 1/2 ounces butter
1/2 cup chopped shallots
1/2 chopped celery stalk
2 garlic cloves
1 2/3 cup white wine
1 bay leaf
2 sprigs fresh thyme
3/4 cup heavy cream
2 tablespoons chopped parsley

Discard any mussels that are open already and don't close when tapped on the work surface. Melt the butter in a large saucepan and cook the shallots, celery and garlic, stirring occasionally, over moderate heat until the onion is softened but not browned.

Add the wine, bay leaf and thyme to the saucepan and bring to a boil. Add the mussels, cover the saucepan tightly and simmer over low heat for 2-3 minutes, shaking the pan occasionally. Use tongs to lift out the mussels as they open, putting them into a warm dish. Throw away any mussels that haven't opened after 3 minutes.

Strain the liquid through a fine sieve into a clean saucepan, leaving behind any grit or sand. Bring to a boil again for 2 minutes. Add the cream and reheat the sauce without boiling. Season well. Serve the mussels in individual bowls with liquid poured over. Sprinkle with parsley and serve with plenty of bread.

My notes: Both times we made the mussels I forgot to buy the celery and thyme so we did it without. Also we used half-and-half cream instead of cream. The first time it separated when we added it to the broth because it was boiling and we added the cream too quickly. Plus we used our Gustav Adolf Schmitt as the wine which was far too sweet. The second time we used a Pinot Gris by Coppermoon and Nica let the broth cool a bit before adding the cream slowly as he stirred. It was a 100 times better the second time and Flo gave it a great review.

My changes for next time? I don't think I'll buy mussels from Costco again. And I'll probably use celery and fresh thyme to see if it makes a big difference.

Easy Peasy Cheesecakes

Easy Peasy Cheesecakes

A good friend of mine, Julie, was recently married. In celebration of this marriage, her aunts threw her this insane bridal shower/stagette complete with feather boas, tiaras, champagne and of course: good food.

Now I just recently admitted to myself that I was lactose intolerant (after the last reaction caused me to almost crap my pants). So I've really tried to watch what I eat. However, that night one of her aunts made these super cute cheesecakes. They were individual sized in little cupcake holders and after popping a couple of lactaid, I have to admit: it was worth it! They were light, fluffy and perfectly portioned.

Here's the easy peasy recipe:
1 package Mr. Christy's Nilla wafers
2 packages Cream Cheese
1 teaspoon vanilla
2 eggs
3/4 cup sugar

Mix all ingredients with a beater and then bake in a 350 degree oven for 15 minutes. Top with whatever topping you want (e.g. blackberries with blueberry coulis, etc).

I tried this recipe at a work party last week and they were a total hit. I did modify the recipe a little bit by using 3 eggs (to try and achieve super fluffiness) and I measured out 1 cup of sugar instead. I wasn't able to eat them that night but feedback was very positive.

Notes about making this though (thanks to my colleagues for helping me out with this): While mixing the ingredients in the Kitchenaid mixer, there were lumps of cream cheese. Try to beat it as much as possible to get rid of the lumps. A few leftover lumps are ok since they'll melt when you bake them. Also, after mixing the resulting mixture will be very liquidy, but it solidifes after the baking process.

Sunday, April 26, 2009

Naan

NAAN:
INGREDIENTS (Nutrition)

* 1 (.25 ounce) package active dry yeast
* 1 cup warm water
* 1/4 cup white sugar
* 3 tablespoons milk
* 1 egg, beaten
* 2 teaspoons salt
* 4 1/2 cups bread flour
* 2 teaspoons minced garlic (optional)
* 1/4 cup butter, melted

DIRECTIONS

1. In a large bowl, dissolve yeast in warm water. Let stand about 10 minutes, until frothy. Stir in sugar, milk, egg, salt, and enough flour to make a soft dough. Knead for 6 to 8 minutes on a lightly floured surface, or until smooth. Place dough in a well oiled bowl, cover with a damp cloth, and set aside to rise. Let it rise 1 hour, until the dough has doubled in volume.
2. Punch down dough, and knead in garlic. Pinch off small handfuls of dough about the size of a golf ball. Roll into balls, and place on a tray. Cover with a towel, and allow to rise until doubled in size, about 30 minutes.
3. During the second rising, preheat grill to high heat.
4. At grill side, roll one ball of dough out into a thin circle. Lightly oil grill. Place dough on grill, and cook for 2 to 3 minutes, or until puffy and lightly browned. Brush uncooked side with butter, and turn over. Brush cooked side with butter, and cook until browned, another 2 to 4 minutes. Remove from grill, and continue the process until all the naan has been prepared.

Thursday, April 9, 2009

Wild Mushroom Orzo

I'm having some friends over this Saturday for lunch and thought I'd review what I was serving. One friend does not eat meat (but does eat seafood) and I saw this great recipe on TV that used wild mushrooms and the mushroom water as the stock and can't remember the steps exactly but found this recipe online:
http://www.epicurious.com/recipes/food/views/Lukes-Wild-Mushroom-Orzo-350821

Wild Mushroom Orzo
Ingredients
For the mushroom stock:
1/2 cup dried porcini mushrooms (about 1 ounce)
1 sprig fresh thyme

For the orzo:
2 tablespoons extra-virgin olive oil
1 small onion, chopped (about 1/2 cup)
1 1/2 cups mixed wild mushrooms (about 4 ounces), washed, dried, and chopped into 2-inch pieces
1 1/2 teaspoons salt
1/4 teaspoon coarse-ground black pepper
2 tablespoons dry vermouth
1 1/2 cups orzo

To finish the dish:
2 tablespoons butter
1/4 cup grated Parmigiano-Reggiano
1 tablespoon roughly chopped fresh parsley
1 teaspoon fresh thyme leaves

Optional:
1 teaspoon white-truffle oil

TO PREPARE THE MUSHROOM STOCK:
1. In a small pot, immerse the dried porcinis in 4 1/2 cups of water. Add the sprig of thyme whole.

2. Bring the mushroom mixture to a boil over high heat, then remove immediately from the stove and set aside for 5 minutes.

TO PREPARE THE ORZO:
1. Heat the olive oil in a medium saucepot. Add the onion and cook over medium heat until it takes on a light golden color, about 3 minutes, stirring regularly to prevent burning.

2. Add the mixed wild mushrooms and stir well to combine. Saute; on medium-high heat for 1 to 2 minutes, until the mushrooms are just starting to color. At this point, but not before, add the salt and pepper (if you do it earlier, before the mushrooms have opened up, the salt will pull out all the moisture). Mix well to combine and continue cooking for another 30 seconds, until the mushrooms have started to reduce and color.

3. Move the pan well away from the heat (so you don't catch fire) and add the vermouth. Stir to combine and then return to the heat for just a few seconds, until the vermouth and mushroom juices form a syrupy mixture in the bottom of the pan.

4. Remove the pan from the heat, add the orzo, and mix well, so the grains are all coated with the pan juices.

5. Remove the thyme sprig from the porcini mixture and discard. Pour the porcinis and liquid over the orzo.

6. Return the pan to medium-high heat and bring up to a low boil, stirring well to combine. Turn the heat down to low, and keep the mixture at a very lazy bubble for about 15 minutes, stirring occasionally. The orzo is done when it's swelled up and become tender, but still has a bit of a bounce between the teeth. There should be just a little bit of syrupy liquid on the bottom, but the orzo mixture should be a bit wet. (If you cook it till the liquid is completely absorbed, you'll have a sticky mess.)

TO FINISH THE DISH:
1. Remove the pot from the heat. Add the butter and mix in well; then add the Parmigiano-Reggiano and continue stirring. Add the parsley and thyme leaves and mix well, until the texture of the dish is softer and richer from the butter and cheese and all the ingredients are well combined. If you're using the truffle oil, add it and mix well so the oil is absorbed.

2. Serve as quickly as possible, topped with a little more of the grated Parmigiano-Reggiano.

Update April 11, 2009: Well, Janine couldn't make the lunch (which turned into a dinner because of the birth of my nephew) and since she was the vegetarian, I ended up using chicken stock instead of the mushroom water. in addition, I used arborio rice instead of orzo. Turned out okay although I think I undersalted. I'd probably cook it again but I would only give it a 7.5 out of 10 this time round. I think it could have had more depth with better seasoning.

Sunday, February 3, 2008

Unduragga: 2007 Sauvignon Blanc


My friend Julie has this uncanny knack for finding really good, cheap wines. One of her last recommendations was Australia's Hardy's Shiraz. Under $10.00 and really tasty without being too spicy.
Her latest wine has been a Chilean wine. A 2007 Unduragga Sauvignon Blanc. It was crisp, fresh and not too sweet or dry.

Rating: 8.5 out of 10

Tuesday, January 29, 2008

Almond-Topped Fish

My sister gave me this recipe to try. She really liked it.
http://allrecipes.com/Recipe/Almond-Topped-Fish/Detail.aspx?src=etaf

INGREDIENTS
1 tablespoon butter or stick margarine
1 small onion, thinly sliced
4 (6 ounce) fillets fresh or frozen cod or haddock, thawed
1 teaspoon seasoned salt
1/2 teaspoon dill weed
1/4 teaspoon pepper
1/4 cup grated Parmesan cheese
1/4 cup fat-free mayonnaise
1 tablespoon minced fresh parsley
1 tablespoon lemon juice
2 tablespoons sliced almonds, toasted

DIRECTIONS
Place butter in a 13-in. x 9-in. x 2-in. baking dish; place in a 400 degrees F oven until melted. Spread butter over bottom of dish; cover with onion. Arrange fish over onion; sprinkle with salt, dill and pepper. Combine the Parmesan cheese, mayonnaise, parsley and lemon juice; spread over fish. Bake, uncovered, at 400 degrees F for 18-20 minutes or until fish flakes easily with a fork. Sprinkle with almonds.
Nutritional Analysis: One serving (1 fillet) equals 223 calories, 7 g fat (3 g saturated fat), 86 mg cholesterol, 716 mg sodium, 4 g carbohydrate, 1 g fiber, 33 g protein. Diabetic Exchanges: 4 lean meat, 1 fat, 1/2 starch.

January 31, 2008 update:
Tried this recipe for the first time. Didn't have haddock fish so used the pollack I had instead. Used the Kraft fake parmesan and fresh dill. I think it was coriander too, instead of parsley.


I really enjoy garlic with my food and although this had none, I surprisingly, still really enjoyed it. I wouldn't have thought to bake mayonnaise but it added a really nice crust to the fish, with deep flavour without being overbearing. The crunch of the almonds was a nice textural contrast. The fish wasn't flaky enough for me although I did cook it for longer than the suggested time and it was a bit too moist. Which is not a usual thing for me to say because I don't like dry fish.


AFTER


Rating: 8 out of 10
Things to do different next time: Use a different type of fish. Maybe the ones that are suggested by the recipe.


Update February 1, 2008:
This is NOT a good leftover food to eat when you've drunk too much and you're looking for something to absorb the alcohol in your stomach. One piece in my mouth and I thought I was going to hurl.

Monday, January 14, 2008

Couscous with garlic, onions and pepper

For the past week I've been struggling with whether to do a cleanse or not. A woman in the office suggested the 'Wild Rose' one but the last time I tried that, I ended up puking all the pills and tonic up. Maybe it's because my insides are just that dirty, but I figure there have got to be easier ways to clean my pipes. And no, that wasn't suppose to sound dirty

The associated Wild Rose D-Tox diet consists of cutting down significantly on meat, no fermented foods, no dairy, no sugars, no soy products, etc. Today almost being Day 1, I decided to do something with couscous.

Couscous has got to be the easiest thing to make. EVER. I only discovered it last week when I directed Mela to make it for the girls night. Since I couldn't have mushrooms (fungus), I looked in the fridge to see what else I could toss together with couscous. Here's what I whipped up:

1/2 cup couscous
slightly more than 1/2 cup hot boiled water
two slices of red onion
2 cloves of garlic, minced
three slices of green peppers (diced)
salt and pepper to taste.

I know, I know. lots of cleanses say NO SALT while cleansing, but that's just Bullshit. I mean, who can eat vegetables without Salt?! Gross.

Anyway, tossed it all except the boiled water into a ziploc container, then added the 1/2 cup of boiled water (then a little more so the vegetables could absorb it a little) and then took it to work. When i was ready for lunch, nuked it for 30 seconds and voila! Mmmmm hmmm. Yummy! I used the Bragg fake soy sauce that I'm "allowed" to use and it was so good. Filling too!

Unfortunately, further research has shown that couscous is actually small granules of pasta so no more of that for me. But it was a nice thought while it lasted. Maybe after I finish my cleanse I'll add it to my regular, healthier diet.

Rating out of 10: 7.5

Sunday, January 13, 2008

Garlic Mushroom CousCous

I was busy trying to put the herb salmon recipe together (see last post) so I asked Mela if she could help me make the Garlic mushroom couscous. I decided on this one because it seemed healthy and I love garlic and mushroom. I didn't want too much onion in the food since it leaves such a strong after-breath.

I'm pretty sure she followed the directions to a T, so here it is:
1 1/4 cup chicken or vegetable broth
1 cup couscous
1/3 cup chopped mushrooms
3 garlic cloves, chopped
1 tsp shredded parmesan cheese or soy "parmesan" shreds

Instructions:
1. Bring broth to a boil in sauce pan or microwavable dish. Remove from heat.
2. Add couscous, mushrooms, and garlic. Mix well.
3. Cover and let sit for 5 minutes
4. Stir and fluff couscous mixture
5. Top with cheese before serving.

Yes, it was *that* easy. Now for the bumps we hit along the way: Mela accidentally opened cream of chicken soup instead of the chicken broth. No biggie, but now I have to find a recipe that uses that since it's just sitting in a container in the fridge. We didn't have real parm cheese so I used the fake KRAFT Parm cheese. Not quite the same, but the results were delicious! It sat for a while before we ate (we were waiting for the salmon and garlic bread) so it was kinda cold but I imagine it would have been better if we could have eaten it immediately.

Would I make it again? Rather would I make it myself again? Definitely. But I would leave it until 5 minutes before everything else was made since it was so simple and quick.

Rating: 8 out of 10.